In this post, I won’t go too deep into Git. My goal is simply to gather the knowledge that’s enough for everyday work and share it as a way for me to review what I’ve learned.
If you’re new to Git, don’t try to swallow everything at once. Git has a lot of interesting concepts, but to get started, knowing a few core commands and understanding what they actually do is already more than enough.
Basic Understanding of Git
We all know Git is used for source code management, but how does it actually manage it?
Simply put, you can think of Git as having 4 layers:
- Working directory: the code currently on your machine.
- Staging: the “queue” before committing.
- Local repository (.git): where Git stores the entire commit history, branches, and project metadata on your machine.
- Remote repository: a copy of the repository on GitHub, GitLab, Bitbucket, or any Git server.
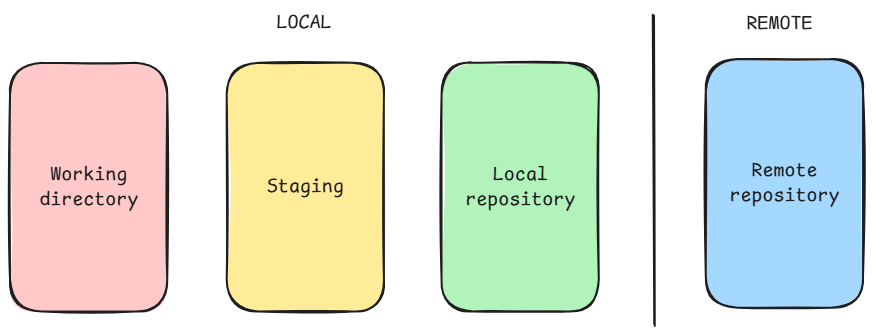
The usual workflow is: modify files in the Working directory → select the changes you want to record and move them to Staging → commit to create a point in history → push to Remote so your teammates can see or continue working on them.
This way of thinking is very important because, at first, I also used to get confused between “I’ve modified the file”, “I’ve added the file”, “I’ve committed the file”, and “I’ve pushed the file”. These steps may seem similar, but they mean completely different things.
.gitignore — the silent friend
Before getting into the commands, there’s one file you should know about right from the start: .gitignore.
This file is used to tell Git, “Hey, don’t track these things.” Usually, these are files like:
node_modules/
.env
.DS_Store
__pycache__/
*.log
Without .gitignore, it’s very easy to accidentally commit an entire node_modules directory that’s hundreds of MB, or worse, push a .env file containing an API key to a public GitHub repository. A common story when you’re a “vai cốt” :D
When creating a new repo on GitHub, you can choose a ready-made .gitignore template based on the language/framework. If you want to create one yourself, this is pretty useful: gitignore.io.
Commands That Open Your Third Eye
git init
This command creates a new Git repository in the current directory. It’s like telling Git, “From now on, track everything in this folder, bro.”
Normally, you only use git init when starting a new project or when you want to turn an existing directory into a Git project.
git clone
git clone is used to copy a remote repository to your machine. It’s usually the first step when you want to start working on an existing project.
git clone <url>
git clone <url> folder-name  # clone into a directory with a custom name
git status
git status is a command I use very often. It tells you what’s currently changed, which files have been added, which files are untracked, and where your current branch is.
If Git were a trip to the supermarket, git status would be like looking down at what’s already in your basket, what’s new on the shelves, and which checkout counter you’re standing at. Before git add, git commit, or git push, just take a quick look at git status to be safe.
git add
git add is used to move changes into the staging area. This is the step where you choose which files you want to include in the next commit. If you picture the 4 layers above, it’s moving things from the Working directory to Staging.
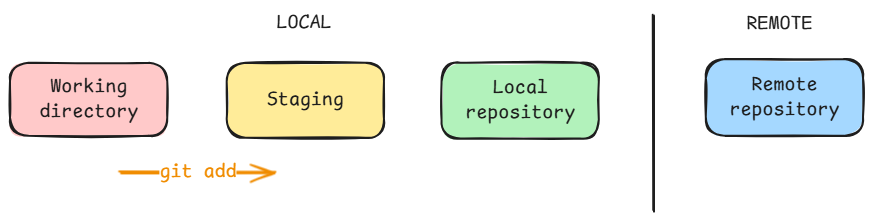
Some common commands:
git add .               # add all changes in the current directory
git add <file-name>     # add a specific file
git add -p              # add individual chunks of changes, more selectively
I usually don’t blindly add everything without checking carefully first. With large projects, looking at git status before adding is a very good habit to keep. If you use VSCode, you can check through the UI in Source Control, where you’ll clearly see the Changes and Staged Changes sections.
If you accidentally add the wrong file or want to restore a file to its previous state, there are 2 commonly used commands:
git restore <file>: restores the file in the working directory to its state from the latest commit.git restore --staged <file>: removes the file from staging while keeping the changes in the working directory.
These two commands help you adjust your shopping basket before paying, so you don’t bring things to the checkout that you don’t actually want to buy yet.
git commit
git commit creates a snapshot of the code at that point in time. It moves the code from Staging into the Local repository.
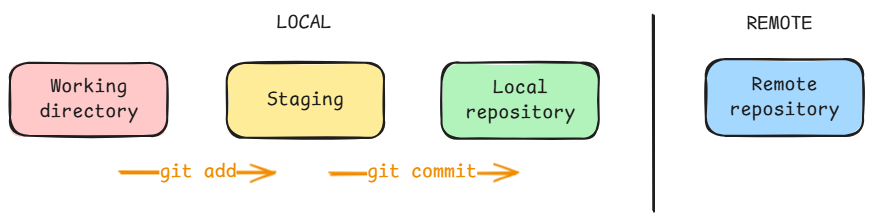
git commit -m "feat: add login page"
git commit                # open an editor to write a longer message
git commit --amend        # modify the commit you just created (before pushing)
At work, I usually write commit messages like this:
feat: add login page

TICKET-123

Add a login page with an email/password form.
Validation is not included yet.
A good commit doesn’t need to be overly elaborate, but it should be clear enough that when you look back later, you still know what you did. If your team has its own convention, just follow the team’s convention. Otherwise, you can refer to Conventional Commits.
git push
git push sends commits from your machine to the remote — in other words, it pushes code from the Local repository to the Remote repository.
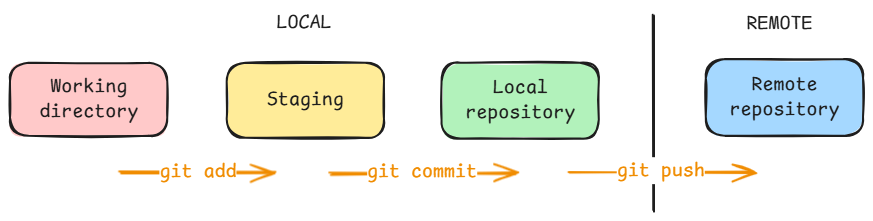
git push
git push origin <branch-name>          # push a specific branch
git push -u origin <branch-name>       # push and set upstream; next time you only need git push
git push --force                       # =))))
Commands You’ll Use No Matter What
git log
git log is used to view commit history. When you need to know who changed what, when they changed it, or where a change came from, this is a command worth remembering.
git log
git log --oneline                      # quick view, one commit per line
git log --oneline --graph --all        # draw the branch tree, very visual
git log --author="name"                # filter by author
I recommend using git log regularly because it helps you understand the flow of the code much better than only looking at its current state.
git diff
git diff shows the differences between versions of files. This can be between the working directory and staging, between staging and the last commit, or between two specific commits.
git diff                          # unstaged changes
git diff --staged                 # staged changes compared with the last commit
git diff <commit1> <commit2>      # compare two commits
git diff master feature/login     # compare two branches
That said, I still usually use the UI to view diffs because it’s more visual. I only use git diff when I don’t have an IDE :D
git fetch
git fetch only retrieves changes from the remote into the local repository but does not automatically merge them into the working directory. It’s useful when you want to update remote information, such as new branches or new commits, without merging/rebasing immediately.
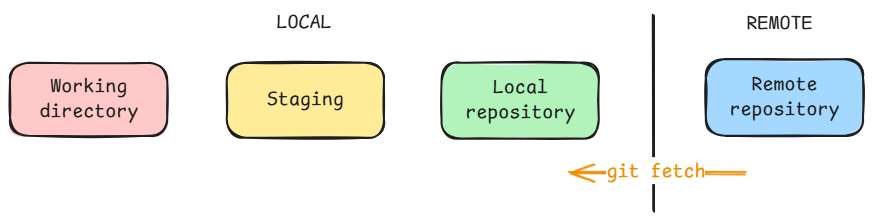
git fetch origin
git fetch --all      # fetch all remotes
After fetching, you can view the remote branch log with git log origin/master or merge/rebase manually.
git pull
git pull combines two steps: git fetch (retrieve changes from the remote) followed by git merge (merge those changes into the current branch). Because merging can create a merge commit, I prefer using git pull --rebase to apply local commits on top of the new history, which keeps the history more linear.
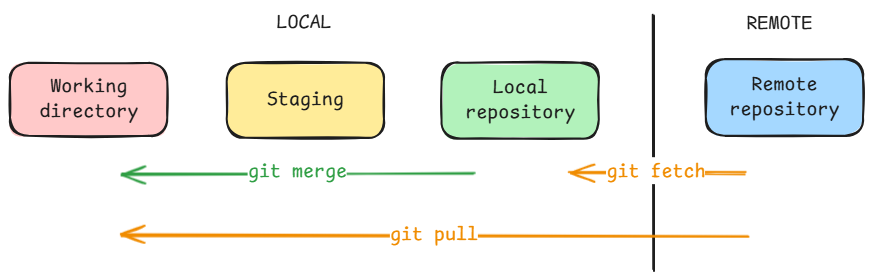
git pull
git pull --rebase
Which approach you choose is up to you. If you’re not familiar with rebase yet, learn how to resolve conflicts during a rebase before using it regularly.
git rebase
git rebase places your commits onto a new base. In other words, it rewrites history to create a straight line of commits. The usual goal is to keep history clean and linear.
git checkout feature
git fetch origin
git rebase origin/master
If there is a conflict during a rebase, Git will stop and let you resolve it step by step. After fixing it, use git rebase --continue. If you want to give up halfway through, use git rebase --abort.
Rebase is pretty complicated to explain briefly in a note like this, so if you want to learn more, check out git-scm.com/docs/git-rebase. Maybe after this post I’ll write another one about Git rebase and branching and stuff :P
git merge
git merge combines the histories of two branches. Unlike rebase, merge creates a “merge commit” that records the point where the two branches converge, so the history looks like a tree rather than a straight line.
git checkout master
git merge feature/login
I usually use the UI for this operation, especially when I want to clearly see which branch is being merged into which.
Resolving conflicts
Whether you use merge or rebase, conflicts can still happen when two people modify the same piece of code. Git marks the conflicting area like this:
<<<<<<< HEAD
your code on the current branch
=======
code from the other branch
>>>>>>> feature/login
How to resolve it:
- Open the conflicting file and find the sections marked as above.
- Decide whether to keep your part, the other person’s part, or combine both.
- Delete the marker lines (
<<<<<<<,=======,>>>>>>>). - Run
git add <file>and continue (git merge --continueorgit rebase --continue).
VSCode has a pretty intuitive interface for resolving conflicts. It shows Accept Current, Accept Incoming, and Accept Both buttons directly in the editor. I usually use that because it’s faster.
git stash
git stash is very useful when you’re halfway through some changes but urgently need to switch to something else. It’s like temporarily putting your pile of changes into a drawer so you can take them back out and continue later.
git stash                   # put changes into the stash
git stash pop               # retrieve and reapply the most recent changes
git stash list              # view the list of stashes
git stash apply stash@{2}   # apply a specific stash without deleting it
git stash drop stash@{0}    # delete a stash
For example, you’re debugging an issue, but you urgently need to cherry-pick another commit to fix something else. At that point, just stash your unfinished changes in the drawer, cherry-pick the other commit and deal with it, then run git stash pop to reopen what you were working on.
git squash
Squash is commonly used to combine multiple small commits into one cleaner commit. When creating a pull request on GitHub, you’ll usually see options such as Merge, Rebase, or Squash and merge.
If your feature branch has too many commits like “wip”, “fix typo”, and “update”, squash is a pretty clean way to tidy up the history before bringing it into the master branch.
git cherry-pick
git cherry-pick is used when you want to take exactly one specific commit from another branch and bring it into the current branch.
git cherry-pick <commit-hash>
git cherry-pick <hash1> <hash2>     # take multiple commits
git cherry-pick <hash1>..<hash2>    # take a range of commits
If you’ve ever used Gerrit, cherry-pick will probably feel very familiar. It’s extremely useful when you need to backport a small fix or take one specific change without merging a whole bunch of related commits.
git branch
git branch is used to view, create, or delete branches. In practice, almost everything should be done on a separate branch instead of touching the master branch directly. But in the project I’m working on, we use Gerrit for VCS and everyone works together on the master branch, so I don’t really touch these branching commands that often.
git branch                     # view local branches
git branch -a                  # view remote branches as well
git branch <branch-name>       # create a new branch (without switching to it)
git branch -d <branch-name>    # delete a merged branch
git branch -D <branch-name>    # delete a branch even if it hasn't been merged (careful)
Branches help you separate work clearly, make reviews easier, and reduce the risk of accidentally breaking code that’s already working.
git checkout
git checkout is Git’s “multi-purpose” command. It can switch branches, create new branches, and restore files. Because it does so many things, it can sometimes be confusing.
git checkout <branch-name>           # switch to an existing branch
git checkout -b <branch-name>        # create a new branch and switch to it
git checkout <commit-hash>           # switch to a specific commit (detached HEAD)
git checkout -- <file>               # restore a file to its state in the latest commit
You’ll still see git checkout a lot in older documentation, tutorials, or simply because you’re used to using it. Knowing it well enough to understand what you’re reading is fine. In practice, Git has split the functionality of checkout into 2 clearer commands: git switch for switching branches and git restore for restoring files. I recommend using these 2 commands instead.
git switch
git switch was created specifically for switching branches. It’s easier to read and more purpose-specific than git checkout (which does too many things and can sometimes be confusing).
git switch <branch-name>          # switch to an existing branch
git switch -c <branch-name>       # create a new branch and switch to it
git switch -                     # switch back to the previous branch
I often use git switch -c feature/add-login when I start working on a new feature. Quick, simple, and there’s no need to remember another checkout flag.
git reset
git reset is a command you should use consciously because it can change history or cause you to lose local changes if used incorrectly.
Three common modes:
# Go back 1 commit, keep changes in staging
git reset --soft HEAD~1

# Go back 1 commit, unstage but keep changes in the working directory (default)
git reset HEAD~1

# Go back 1 commit and lose all uncommitted changes
git reset --hard HEAD~1
In summary:
--soft: the commit disappears, but the changes remain in staging. Useful if you want to rewrite the commit message.--mixed: the commit disappears, the changes return to the working directory and are no longer staged. Useful if you want to make further edits.--hard: the commit disappears and the changes disappear as well. Only use it when you’re 100% sure.
If you accidentally use --hard, you may still be able to recover using git reflog to view the history of HEAD, then git reset --hard <hash> to go back. Git still keeps commits for a while before cleaning them up.
The Flow I Usually Use Every Day
Whenever I open a repo to work on it, the flow I usually follow is pretty simple:
git pull --rebaseto get the latest code before starting.git switch -c feature/abcto create a separate branch for the new work if needed.git logto quickly look at the history and see where my branch is.- Continue coding. Before creating a commit, pull again if a lot of people are working on the project.
- If I urgently need to switch tasks, use
git stashto temporarily put the changes away, deal with the other task, thengit stash popto bring them back. - If there’s a conflict, resolve it locally before pushing. Resolving it early is always easier than waiting until everything piles up.
git push -u origin <branch>and then create a pull request.
In short, I like to keep the habit of updating my branch regularly and checking the history with git log. These two things sound small, but they help reduce quite a lot of trouble when working in a team.
Tips
In VS Code, I install GitLens to make viewing history, blame, and diffs more convenient. The extension makes working with Git much more comfortable, especially when you need to trace back who changed a line of code, when they changed it, and why.
There are also a few other small things that I find useful:
- Use
git commit --amendto modify the commit you just created (when it hasn’t been pushed yet) instead of creating another “fix typo” commit. - Haven’t thought of anything for this bullet point yet. I’ll update it when I become a Senior :P